Mending a Loose Button: Thread, Tension, and a Secure Finish
Mending a loose button is easier when thread, stitch and tension suit the garment, helping you make a tidy repair that moves comfortably with the fabric.
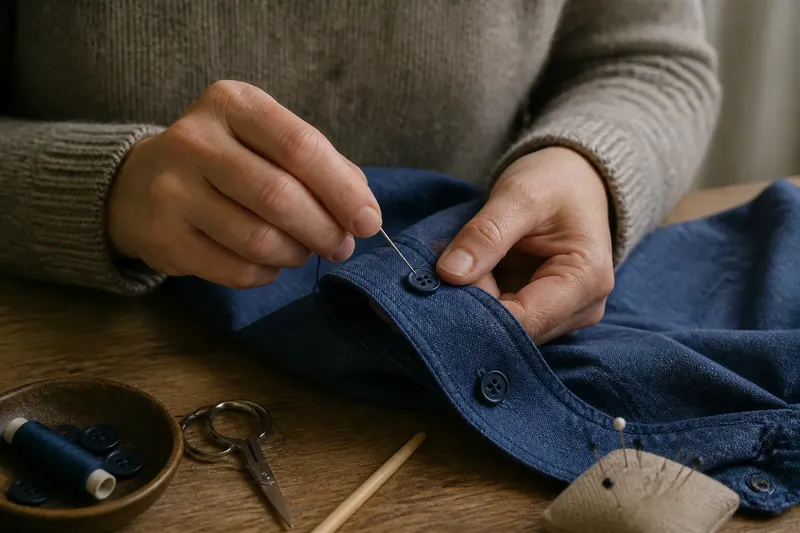
A button hanging by a few threads can make an otherwise sound shirt awkward to wear. Mending a loose button starts with a simple choice: match the thread and stitch to the button, fabric and way the garment fastens, rather than pulling the new sewing as tight as possible.
Mending a loose button begins with a small inspection
Before threading a needle, look at the button’s holes, the fabric around them and the remains of the old sewing. Is the button flat with two or four holes, or does it have a raised shank underneath? Is the cloth tightly woven, stretchy, thick or delicate? These details point towards a suitable stitch and help reveal whether the button itself is still sound.
Remove loose remnants with small scissors, taking care not to cut the garment. If the cloth is frayed, thinned or torn where the button sits, sewing directly into that weak spot may not hold. A discreet patch on the inside or a different button position may be needed; for a valuable or complicated garment, a tailor can assess the repair.
Check the button against the other buttons on the garment. Compare its size, shape and colour, and look at whether matching buttons are sewn on with two or four holes. A replacement that is too large can strain the buttonhole, while one that is too small may slip through it. If you have no close match, a spare stored inside the garment may be a better choice than an obvious substitute.
Match thread and needle to the cloth
For ordinary woven clothing, a general-purpose sewing thread is usually a sensible starting point. Choose a colour close to the fabric or the existing button thread. The sewing should be unobtrusive, but a close match also makes it easier to see whether the thread has worn through later.
Use a thread that feels appropriate to the garment rather than simply choosing the thickest available. Very fine thread can be vulnerable on a frequently fastened coat; bulky thread may make a small shirt button sit awkwardly. If the garment has a maker’s care label, or the thread or fabric has special requirements, follow those instructions.
A hand-sewing needle should pass through the buttonholes and cloth without forcing. A fine needle is often easier to guide through delicate fabric, while denser cloth may need a sturdier one. If the needle catches repeatedly or leaves an enlarged hole, pause and choose a better match rather than tugging it through.
Cut a manageable length of thread and thread the needle. A single strand gives a flatter finish on light fabric; doubling the thread can make the sewing more robust on sturdier cloth. Whichever you choose, avoid an unnecessarily long length: it is more likely to tangle and become abraded as it passes through the fabric.
Choose the stitch for the button’s construction
A two-hole button is straightforward to sew with repeated passes through both holes. Keep the button aligned with its neighbours, and let the thread cross between the holes on the underside. This creates a simple attachment without adding visible sewing across the button’s face.
For a four-hole button, sew either as two parallel pairs or as a cross, following the pattern used on nearby buttons if there is one. Parallel pairs give a neat, ordered appearance; a cross spreads the thread across the holes in a different arrangement. Both can work well when the thread lies flat and the button remains correctly aligned.
A shank button has a loop beneath it, so the thread passes through that loop rather than through holes in the button face. Shank buttons already stand away from the fabric. For a flat button, leave a little space between button and cloth by inserting a matchstick or similar thin spacer while sewing, then remove it before finishing. That small gap, often called a thread shank, gives thicker fabric room to sit between the button and buttonhole.
Use a simple running or backstitch to anchor the thread in the fabric beside the button, then make the passes through the button as consistently as you can. A backstitch catches the cloth more firmly than a long, loose running stitch, but avoid sewing a large area: the fastening should be secure without making a stiff lump beneath the button.
Steady tension means snug, not strained
Thread tension is the quiet part of the repair. Pulling every pass hard can pucker the cloth, distort a buttonhole or make the button sit too close to the garment. Leaving the thread slack lets the button wobble and rub against the fabric.
A useful way to judge tension is to pause after each pass. The thread should lie against the cloth without gathering it, and the button should not tilt when you touch it. Think of the fastening like a door hinge: it needs a little room to move, but not so much play that it rattles.
Imagine you are repairing a shirt button that has come loose at the cuff, with the surrounding cotton intact. You match the thread to the other buttons, sew through the four holes in the existing parallel pattern, and leave a modest gap under the button before wrapping the thread around the stitches beneath it. The expected observable result is a button that sits level, moves slightly when handled and passes through its buttonhole without pulling the cuff into a fold.
Finish the sewing without a bulky knot
Once the button feels stable, make a few small securing stitches on the underside near its base. If you have left a thread shank, wrap the working thread around the strands beneath the button before securing it; this supports the gap and keeps the sewing together. Keep the knot and thread ends flat so they do not rub against skin or catch on another layer.
Do not rely on a knot alone if the surrounding fabric is already damaged. The knot holds the thread to itself, but it cannot strengthen cloth that is tearing away. In that case, distribute the sewing across sound fabric or reinforce the area with a suitable backing before attaching the button.
Trim the thread close to the finished sewing without nicking the fabric. Then fasten and unfasten the button gently. It should pass through the buttonhole without force, remain aligned and avoid pulling the surrounding cloth into a ridge. If it is too tight against the garment, a few stitches may need to be loosened and resewn with more room.
Which button-sewing questions matter most?
Should I use one strand or two?
One strand can make a neat, low-profile repair on light fabric, while two strands can suit a sturdier garment or a button that takes more strain. The thread should still pass freely through the holes and lie without a bulky ridge.
How tight should a sewn-on button be?
It should feel secure but retain enough movement to pass through its buttonhole comfortably. If the cloth puckers or the button cannot lift slightly away from the fabric, the sewing is probably too tight.
Can I sew a button on with a machine?
Some sewing machines have a button-sewing setting or attachment, but the method depends on the machine and garment. For one loose button, hand sewing gives direct control over alignment and the space beneath a flat button.
What if the replacement button does not match?
Check a stored spare or choose a button with a similar size and fastening style so it works with the existing buttonhole. If appearance matters, replacing a pair or a row may look more deliberate than using one conspicuously different button.
Check the repair as the garment moves
A button can feel secure while the garment lies flat and still sit poorly once worn. After sewing, gently flex the fabric around it and check that the cloth stays smooth. For a shirt, test the fastening at the cuff or placket; for a coat, check that the button can take the fabric’s thickness without being pulled sideways.
Keep spare buttons and a small sewing kit together if you already have them: a needle, suitable thread, scissors and a few saved buttons can make a future repair less troublesome. The main lesson in mending a loose button is not to sew as hard as possible, but to give the thread a sound anchor and the button enough room to do its job. A little attention to tension can keep an ordinary garment wearable without changing what already works about it.